

Last Updated on 8 months by Christopher G Mendla
I have a shed that is about 30 years old. The doors were starting to deteriorate including the hinges and trim. The process was very labor intensive.
Overview
The shed is about 20′ x 10′. It is about 50′ from my house. It is at least 30 years old. The construction is standard 2×3 frames sheathed with exterior plywood. The doors are a simple square 2×3 frame with exterior plywood. The doors are trimmed with 1×3’s. There are double doors facing the pool and another set facing the yard.
Overall, the shed is in decent shape. It is raised off the ground by about 6 inches. The floor is solid and the roof has a few more years of life with no leaks. .
I noticed that the trim had rotted and some of the hinges were missing screws. My concern was that the longer I waited, the more the rot would spread and there was a possibility of a door failing in the middle of the winter.
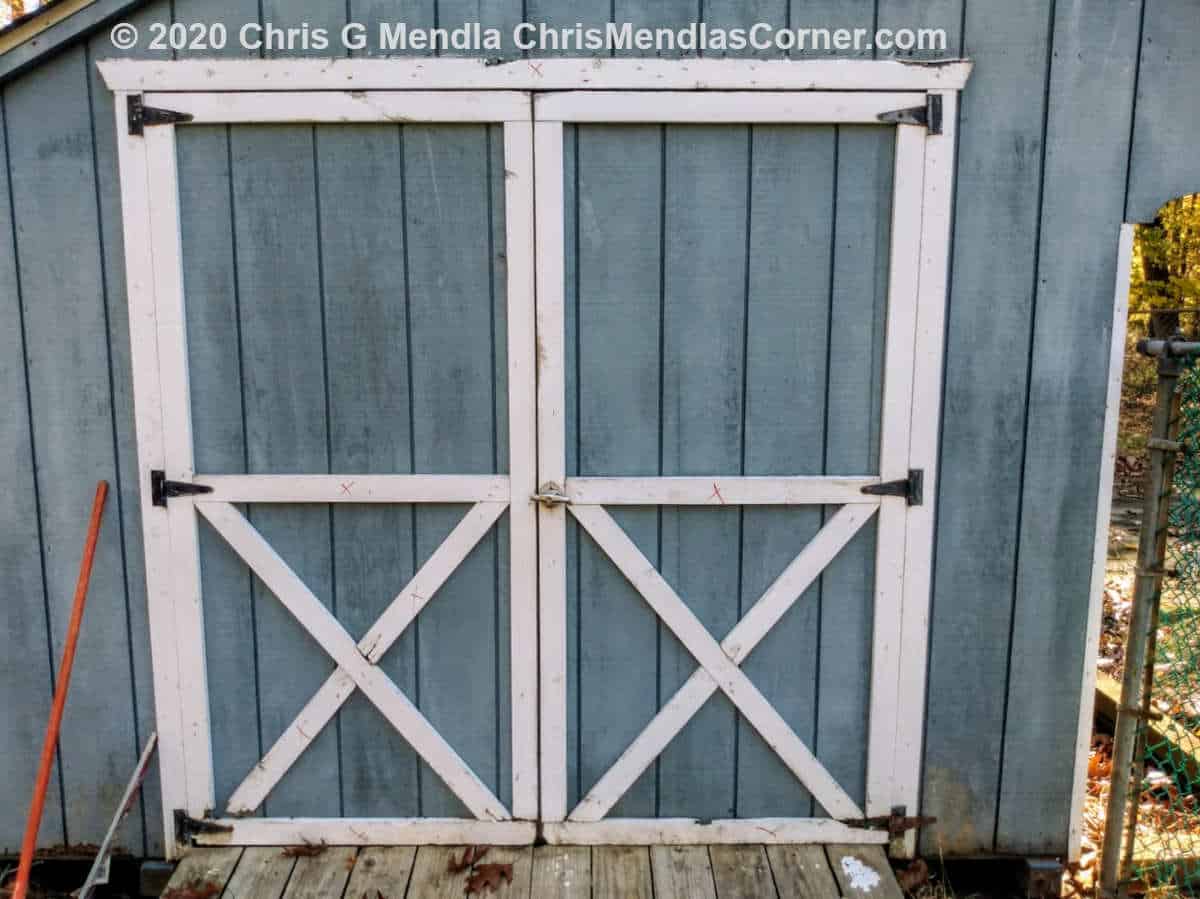
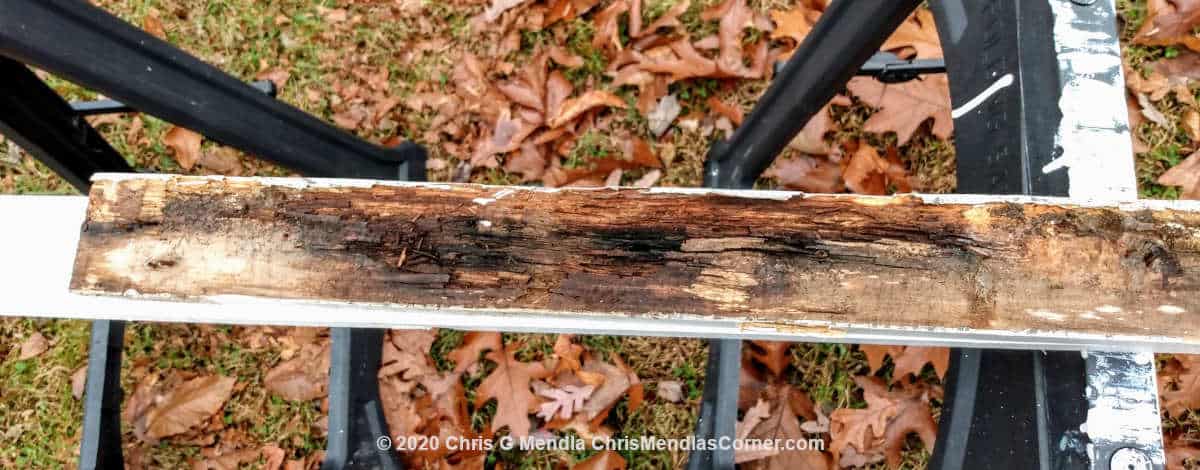
In the image below you can get a better idea of the design of the doors. Fortunately the outermost trim was sound.
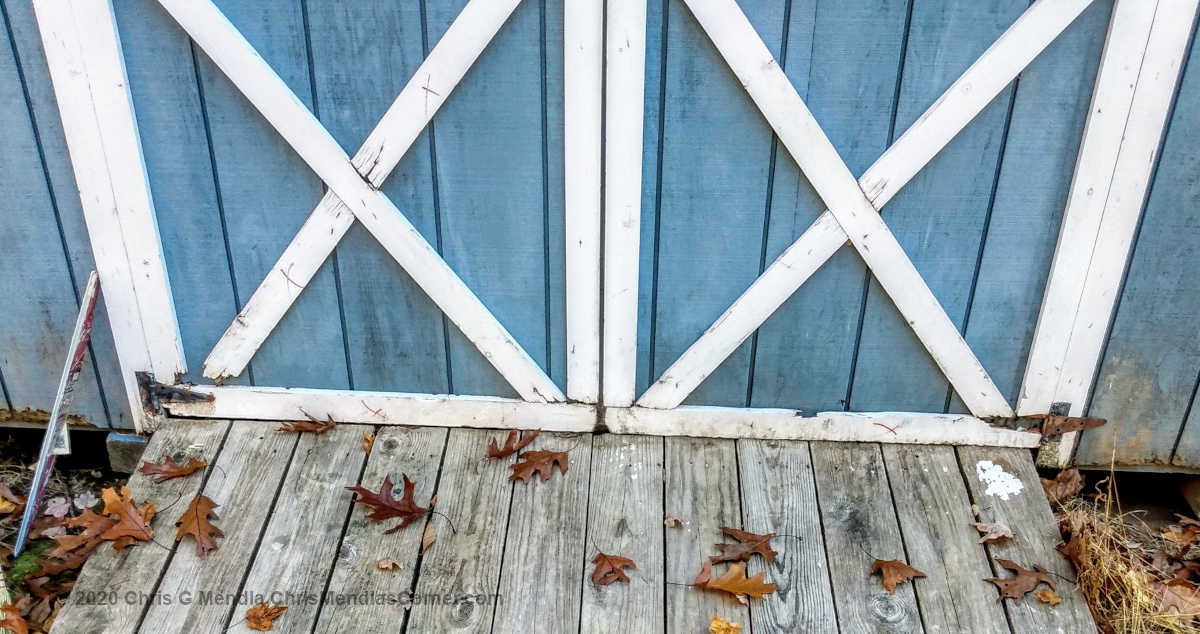
The image below show just how badly the wood had rotted. The bottom right hinge was not supporting the door at all. It was entirely supported by the middle and top hinges.
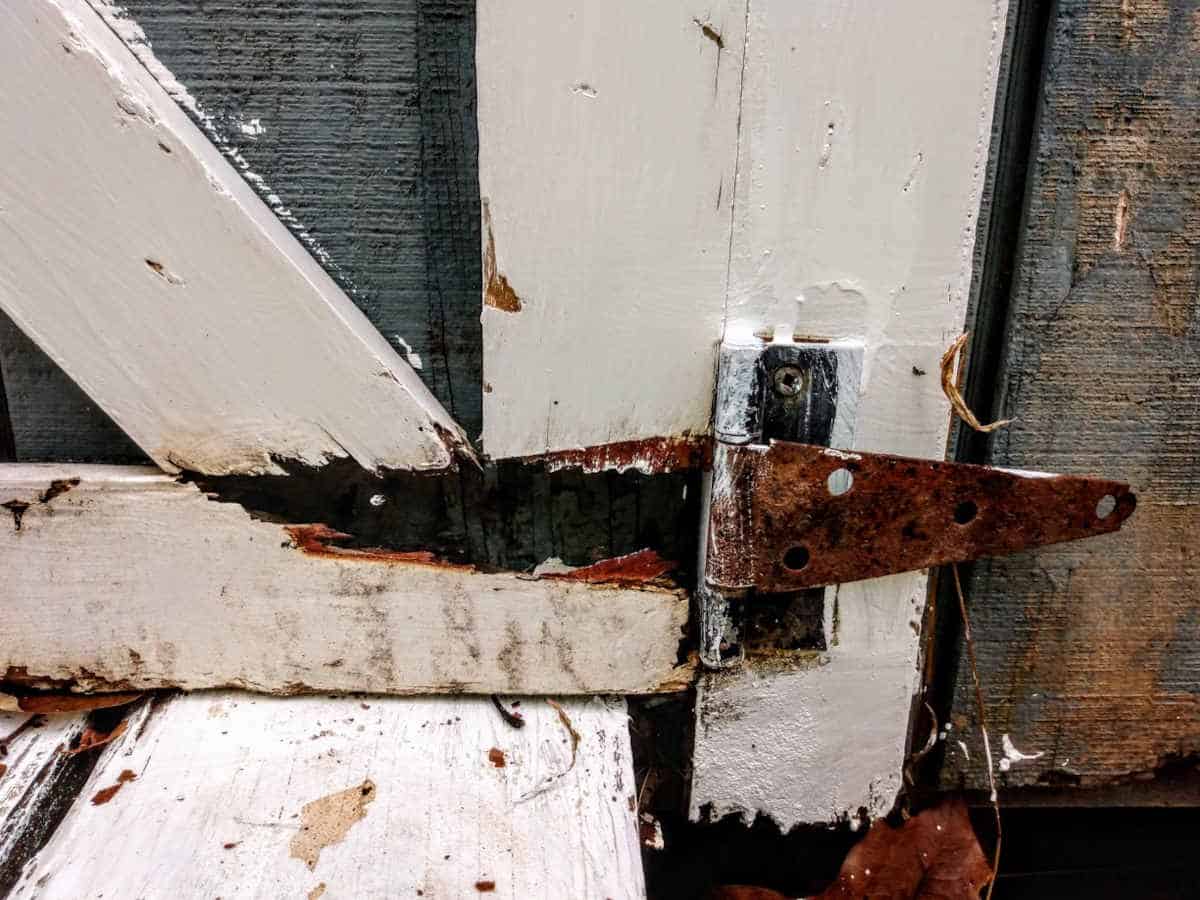
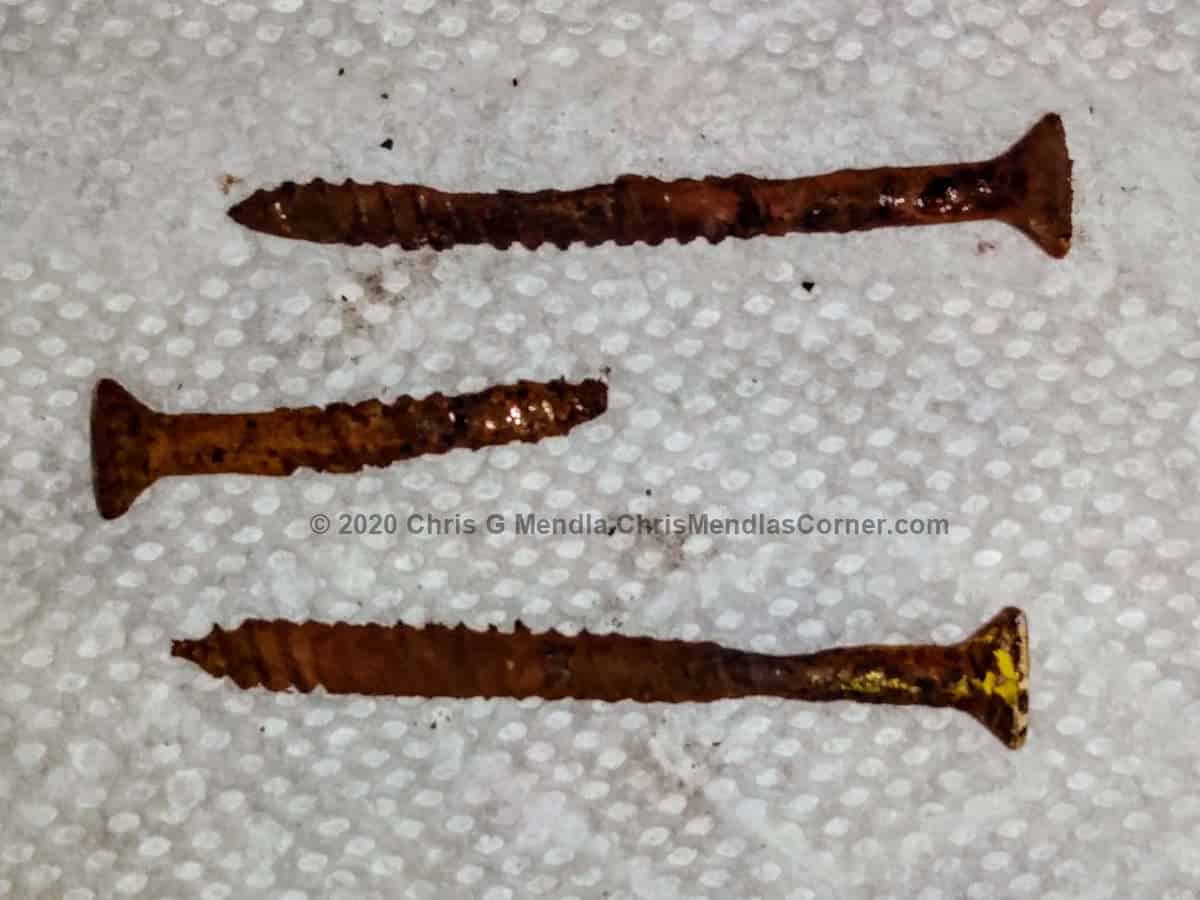
In addition to the wood rotting, the screws holding the hinge had rusted and corroded. The screws below were some of the more intact examples.
Alternatives
There were a few alternatives with regard to this.
Do nothing
I could just ignore the situation for now. There is a lot of other work on the list. However, I use the shed to store my tractor year round. During the winter, the tractor is used for plowing. The bottom hinges on two of the doors had completely separated from the door. If the hinges failed during the middle of the winter, I would find myself doing emergency repairs in freezing weather instead of a mild fall day
Rebuild the doors completely.
I opted against this for two reasons: cost and the difficulty in doing that job solo. The process would be simple, Build the simple door frame, add the sheathing and trim and re-hang the door. However, the doors are awkward and this would not be a one person job.
Fix the hinges, trim and rot.
I decided to take this path. I would fix the doors to (1) prevent the other hinges from failing and (2) Stabilize the rot to gain another 5 years or so from the door.
By working on one hinge at at time, I figured I would not need help re-hanging the doors.
The plan
My plan was to paint the trim that was still sound. Then, I would replace the rotted trim and make sure that the hinges were soundly fastened to the door and structure.
Tools and materials.
- 1×3 dimensional lumber – I made a decision to go with pine instead of the more expensive synthetic wood. I was able to get a dozen straight pieces with very few knots.
- 1 Gallon paint and primer. I went with the Behr paint and primer in a satin finish. The trim was plain white so there were no issues with color matching
- 5 tubes of clear silicone caulk and a caulking gun
- A cutting tool with a variety of wood and metal cutting tools.
- 20 volt Black and Decker tools. A drill and small circular saw
- A cheap miter box.. It was a Stanley but it looks more like something for a kid’s workbench. But it did the job
- An electric brad/staple gun.
- A 12″ combo square
- 2″ deck screws
- A 17″ demolition bar and hammer
- Cleaning spray containing bleach
- Rags and paper towels
- Nitrile gloves.
- Tables and sawhorses.
- A set of drill bits.
- Tape measure
- Kneeling pad or kneepads
- Safety goggles.
- Clear Krylon or similar spray paint.
- Rustoleum rust converter. Black to match the hinges.
- A small wood rasp
- A handful of sharp pencils or carpenter’s pencils
Painting the trim
Before I painted the shed, I used my power washer and foam lance to clean the trim and siding. The bottle for the foam lance was filled with about 9/10’s of the way with clorox and 1/10th with car soap (no wax). That removed a lot of the existing mold and mildew from the sheathing and trim.
I painted the existing trim. I didn’t take a lot of pains with it. It is a stinking shed, not a Gilded Age Mansion in Newport Rhode Island. My plan is to paint/stain the sheathing in the spring.
I marked the deteriorated pieces and, of course, didn’t bother to paint them.
The replacement trim got two coats of primer/paint.
Time out – getting the replacement trim cut properly.
One of the more difficult parts of this exercise was to get the angles and sizes correct for the replacement trim. For the last door, I left the original trim in place while measuring and marking the replacement trim.
Removing the screws from the hinges
In some cases, I needed to remove a few of the screws securing the hinge to the door. This turned out to be more of a problem than I anticipated. The hinges had a square drive. However the rust on the threads in the wood made it almost impossible to remove them.
I tried drilling the heads out. That trick usually works. However, it seems that the screws were hardened steel. I burned out a couple of good bits. Screw extractors proved useless.
I figured I could get under the hinge with a blade from the cutting tool. That led to more frustration and some really colorful, creative language.
The solution was brute force with a combination of a hammer, pry bar and cutting tool. The experience with the first hinge helped make a decision to not try replacing the hinges.
Removing the trim
Once the hinge is free of the door, you can remove the trim. Every situation will be different. The construction used was:
- Single brads 1 1/2″ from the outside.
- Heavier gauge staples from both the inside and outside
- 1 1/4″ inch deck screws from the inside, through the door, into the trim.
TIP – Lightly mark the existing location of the trim before removing it. It also would be a good idea to take a picture or two.
Removing the trim took a good bit of effort. The screw heads were difficult to find on the back of the door. I ended up hammering the pry bar and brute forcing the trim.
As I removed the pieces, I marked them. They were not very useful as templates for the replacement trim as the ends had rotted in most cases.
This left about two dozen brads and at least two screws for each piece of trim removed. The brads were easily removed with the cutting tool and a bi-metal metal cutting blade. The staples could either be cut or simply pulled out with a pair of water pump pliers or diagonals.
The screws were a little more of a problem. Trying to cut them ruined the cutting tool blades quickly. I found that a few whacks with a hammer backed them out enough to be able to grab them from the other side with the pry bar.

Some of the trim was badly rotted. The moisture in the rotted sections was causing issues with the sheathing. I had to get a little creative in dealing with some of the more rotted areas on two of the doors. I removed the rotted portion and trimmed and planed a 1×3 to replace the part of the sheathing that had rotted.
Cleaning the door
The area behind the trim was discolored and had mildew. That was easily cleaned with a Clorox based mildew spray.
Sealing the door and painting the hinges.
I used the clear Krylon to seal the door where the replacement trim would be installed. The outside temperature was in the high 50’s. Keeping the can inside overnight helped keep it from being too cold.
Where I could, I wirebrushed the back side of the hinges and hit that with the Rustoleum rust converter.
Cutting the replacement trim.
A decent quality miter saw or radial arm saw would have made this job a lot easier. Because the area where the X’s are is not rectangular, the angles are not 45 or 90. You don’t need to be exact but the closer you are, the better it will look.
When you cut the replacement trim, you will expose fresh wood. That needs to be sealed. I didn’t want to wait for the paint to dry so I just hit the cuts with clear krylon. White spray paint would probably also work. If you had the time, the trim paint would be the best.
When I ran into situations where the length was a hair too long, I used a grinder with 80 grit sandpaper. That was crude but effective.
Sealing any holes in the sheathing
I considered using wood filler for some of the small rot holes and for the screw holes. I decided to simply use the clear silicone. I’m not sure how that will work in the long term but I think it will do. In addition I ran a light bead on the upper part of the trim to try to prevent water from getting between the trim and sheathing
Re-attaching the trim.
I had brads for the staple/brad gun that were long enough to go through the trim and sheathing without protruding. I put about 20 brads in the long sections and about a dozen in the shorter pieces.
I am considering using screws from the back side of the door into the trim but I’m not sure that is necessary.
Beware of screwing or nailing the door shut
You need to be careful to make sure that you don’t end up screwing or nailing the door to the structure. Always make sure that you can open the door. That sounds obvious but the sheds are mass produced and aren’t really designed with repairs in mind.
Check for protruding screws.
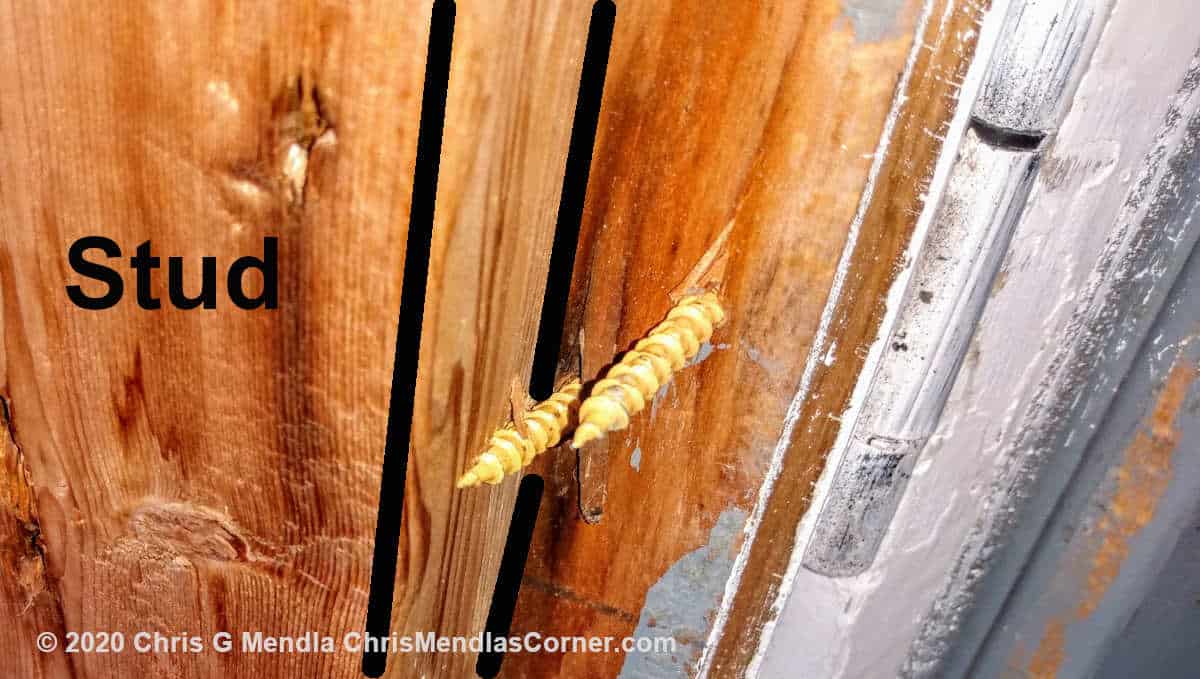
I was surprised that in the original building of the shed, the hinges didn’t line up with the frame of the door. Not the door frame but the 2x3s that give additional support to the door.
In the image below you can see that 2 of the 4 holes for the screws on the door side of the hinge missed the stud. This means that the screws are only biting into the trim and sheathing.
The solution is to back the screws out and replace them with 3/8″ bolts and nuts. In some cases, you might be able to add a backing block but this isn’t possible here.
Even with 2 of the four screws poorly located, the door has held up for three decades including a couple of times when it was banging around in the wind.
How long will it take to repair my shed doors?
There is no real answer to this question. It depends on a number of factors
- The level of deterioration
- How deep you want to dive into the repair.
- What is your target life extension? In other words, how long do you need the repairs to last?
- How important is appearance?
Unfortunately I didn’t track the amount of time I spent on the whole project. My estimate is that it was the equivalent of three or four full days. however, I broke the time into blocks lasting a few hours. It did take a bit more time than I anticipated. I still have a few minor tasks that I’ll do when I get a chance such as exchanging screws for bolts in a couple of places
Summary
Overall, it was probably a good use of my time and resources. The possibility of a door coming off it’s hinges in the dead of winter is now minimal. Some of the worst rot and deterioration is addressed.
If you look at the shed from the house, it is difficult to see any improvement. I’m on 2 1/2 acres so most people wouldn’t even know I have a shed much less be able to observe any flaws.
I don’t belong to a gym so projects such as this tend to be fairly good exercise.
One takeaway is that projects involving shed type doors can be involved.
Update August 2023
It has been 2 1/2 years and the trim is holding up very well. The hinges have remained aligned properly.
