
Adding insulation to existing uninsulated forced hot air ducts can significantly reduce your heating costs and extend the life of your HVAC system.
A series of events made me realize that I was losing a significant percentage of my heat due to uninsulated ducts. The process of insulation will vary according to your particular installation.
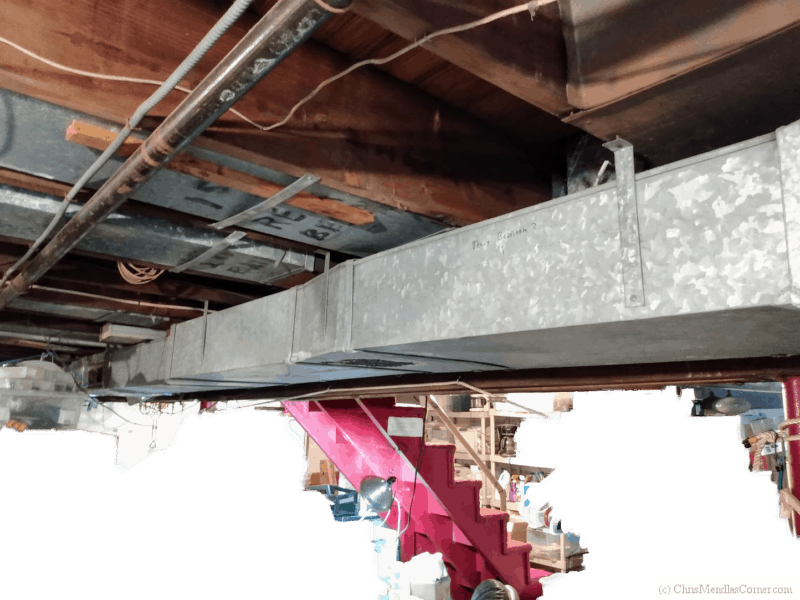
I was working in an unfinished basement where I have no intention of finishing it in the foreseeable future. It is used for storage and laundry.
The ducts are rectangular galvanized sheet metal. There is enough space above the main duct to install the insulation. The branch ducts have a little less clearance.
Materials and tools
There is about 30′ of main duct that I wanted to insulate immediately.
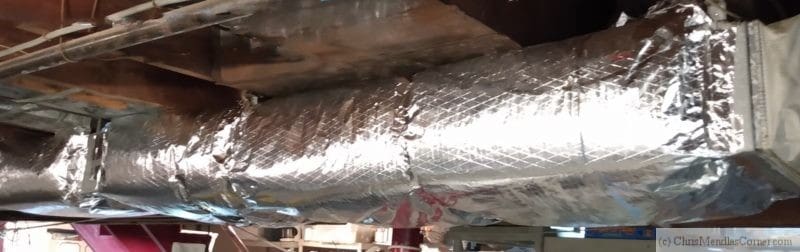
While researching the available products, one brand was consistently slammed for falling apart while handling it. I opted for a type that had better reviews, the 60 sq. ft. R-6 Insulated Duct Wrap from Home Depot. That is 24″ wide with a strip on one side that makes connecting the sections easier.
I picked up two rolls of NASHUA MULTI-PURPOSE FOIL-1.89″ x 50 yard tape. Do NOT use Duct tape. Yep, you read that correctly. Duct Tape simply won’t hold up. In addition, I used:
- A head lamp
- A sharp knife
- A table and straight edge for cutting
- Scissors
- Tape Measure
- Air Mask – You will be kicking up a lot of OLD dust and there will be some fiberglass in the air.
- Safety glasses
- Vacuum cleaner to clean the tops of the ducts.
- Cleaner for the ducts where you are going to apply the tape.
- A stepladder
- Heavy Duty Nitrile Gloves. 5 mil gloves will protect your hands from the dust and fiberglass. But, if you are working with the tape I found that 9 mil gloves worked a lot better as they don’t rip as easily if the tape sticks to them.
Be careful….
NOTE – Watch for nails protruding from the ceiling. In older houses, footers were often nailed straight through the floor. Hitting one with your head while climbing a stepladder could be VERY nasty.
Installation
Installation is a matter of starting at one end, preferably the end closest to the heater. I put the connecting strip toward the heater. When you measure the perimeter of the duct, allow a couple of extra inches. The bend radius means that you need more paper/foil than the perimeter. Try 6″ or so and see how that works and adjust accordingly.
The image below shows three sections of insulation. Having an extra set of hands would really help. I chose to got with doing it a bit faster rather than trying to be showcased by Martha Stewart. The silver tape blends in nicely with the foil outer wrapping.
Tape Tricks..
When handling the tape, I found a couple of things that worked for me.
- As mentioned above, if you are wearing gloves, use the 9 mil nitrile gloves so they don’t rip as easily.
- Getting the backing away from the tape is a task best done when you have not consumed caffeine. Trying to separate the backing from an end cut with a knife or scissors was frustrating. I found the best results came from tearing the tape at a slight angle. I could usually get the backing separated with the razor knife.
- Don’t pull all the backing off at once, even for short lengths. The tape will coil back up and stick to itself.
- Clean the ductwork, especially on the top if you are using tape there.
Measure twice, cut once.. But add some extra
Getting a tight neat fit is a bit of a chore. However, you don’t want it too tight. The more you compress the insulation, the more you lower the effective R-value.
You will need to work around supports and branch ducts. If your system has adjustable baffles for the branch ducts, be sure to not cover them.
If any of the existing ducts were labelled as to the rooms they serve, be sure to preserve that information.
I found two places where the branch ducts had a poor fit into the main duct. I bought a tube of water based duct sealant to deal with that. I also purchased some 2.83″ extreme weather foil tape for a couple of places where the thinner tape wasn’t covering everything I wanted covered.
Conclusion
The job is a bit tedious but in terms of effort, it isn’t that hard. The materials cost slightly over $100. I spend about 4 hours working on it. You don’t need to cover every inch of every duct. However, the more you can cover, the more your efficiency is increased.
